Categories
Computers Mac

Create ISO on Mac OS X 10.4

On Mac OS X 10.5 it is possible to create ISO files directly from the Disk Utility application but on Tiger, this is not supported. A quick solution is to use the terminal and realising that an ISO file is nothing more than a binary dump of the contents of the disk:

Start by opening a terminal window and insert the CD or DVD you wish to make an image out of. Then type “drutil status” to get information on the CD/DVD reader.

Unmount the disk by typing

$ diskutil unmountDisk /dev/disk1
Disk /dev/disk1 unmounted

Create the ISO file by using the dd command:

$ dd if=/dev/disk1s0 of=image.iso bs=2048

Note: It appears that the device should be stated as above for CDs but similar to /dev/disk1 for DVDs. YMMV

Categories
Computers Mac

Partition USB disk with FAT16 on Mac OS X

A previous article explained how to upgrade the BIOS on an Eee Box by using a USB memory formatted with FAT16.

As far as I have found, formatting with FAT16 can not be done through the GUI on Mac OS X. Instead one has to use the terminal.

First type “diskutil list” to see the devices on your system, making very sure that the following command is applied to the USB flash drive and not to a drive with important data. You have been warned!


diskutil partitiondisk /dev/disk1 1 MBRFormat "MS-DOS FAT16" "Data" 512M

The arguments have the following meanings:

  • /dev/disk1: The disk device to be partitioned and formatted
  • 1: The number of partitions
  • MBRFormat: The partition format
  • MS-DOS FAT16: The partition type
  • Data: The partition name
  • 512M: The size of the partition
Categories
Computers Gadgets Linux

Automatic boot after power loss on Asus Eee Box

I have been planning to upgrade my old Mini-ITX based Linux server with an Asus Eee Box. I have purchased the Eee Box and was just waiting for the upcoming release of Ubuntu 8.10 to run on it. But then I noticed that the computer didn’t start automatically after a power outage. There is usually a setting in the BIOS for this but I just couldn’t find it on the Eee Box. Not being able to boot automatically after a power loss posed a major setback for my plan of migrating my server.

It turns out that the Eee Box BIOS prior to version 0902 didn’t have support for restore after power-loss so to solve the issue I had to upgrade the BIOS.

Normally, BIOS upgrades can be a source for some concern as there is always a risk that the computer is left completely bricked. Also, it can be difficult to get a bootable USB device with the correct BIOS flashing utility and with the new BIOS firmware.

The BIOS firmware can be downloaded from Asus support pages by searching for the Eee Box model name (B202).

The documentation for the Eee Box was not very helpful. It said that there is a upgrade utility in the OEM version of Windows that the computer came with. However, the first thing I had done with the computer was to wipe the hard drive and to install Ubuntu.

The solution to the problem is to insert a FAT-16 formatted USB device with the desired BIOS firmware, then boot while pressing Alt+F2 to get into a special boot menu. There, one can choose the firmware file.

This was definitely the simplest BIOS upgrade processes I have come across – once I found the information on how to do it.

Categories
Computers Gadgets Linux

Upgrading the RAM on Eee Box

As I wrote in a previous post, I recently purchased an Eee Box. As I targeted it as a replacement mail and web server I thought that the included 1GB RAM was a tad low. I bought the replacement memory together with the Eee Box itself and here are some images and comments outlining the process of upgrading the memory.

Both the hard drive and the memory are accessible from the bottom of the device. Removing the table stand (notice the screw mount on the left in the image) reveals the following:

Before RAM upgrade

The left one of the two Eee Box stickers needs to be removed in order to access the hard drive. The sticker on the right needs to be removed for the RAM upgrade. Although I was only planning on upgrading the RAM, I peeled off both stickers.

Without stickers and with the hard drive removed

The hard drive is a Seagate Momentus 5400.5 160GB. It looks simple enough to switch out for a larger one if that is required. 160GB is plenty for the tasks that I will use it for so I didn’t change it.

Original Eee Box hard drive

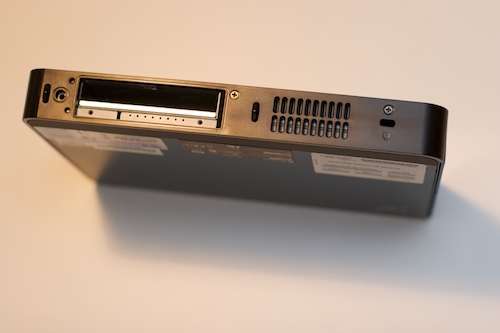
With the two screws on the right (see image above) removed the side cover can be removed. This led to some confusion as the few other guides on the Internet didn’t mention exactly how to pry off the cover. To help you out, have a look on the following image. The side where the screws were (shown with red) is already loose and there is no need to try to start from there. Instead take a table knife and work on the spots shown with the green crosses where the cover is kept in place.

How to open the Eee Box

With the side cover off we now need to unscrew just one screw in order to access the memory compartment in the lower right:

Eee Box with the side cover off

The unit was originally equipped with two DDR2 667 MHz SO-DIMM cards of 512MB each.

The original RAM memory is exposed

I took out the original memory and instead inserted two 1GB DDR2 667 MHz SO-DIMM cards made by Crucial.

New RAM memory

Finally, I booted the computer and checked the memory.

Task manager showing 2GB of RAM

Five minutes after this I had started installing Ubuntu 🙂

While this process was slightly more complex than changing memory on just about any other computer (laptop or stationary) some kudos goes to Asus for making it much easier to change the RAM than what was the case on my Acer Aspire One. The only really non-trivial part was getting the side cover off without breaking it. However, once I knew how to open it, it was actually trivial as well.

Categories
Computers Gadgets Linux

Uuunboxing the Eee Box

The Eee Box has finally been launched here in Sweden. I have had my eyes on it for some time as I am in dire need of upgrading my old server (mail, web etc) and this looks ideal from a performance/electricity point of view. It also comes at a very good point with the rather recent LTS release of Ubuntu 8.04 – although I will probably go for the bleading edge and run Intrepid Ibex when it is released on October 30th. The Eee Box is only available with Windows here in Sweden but hopefully that will change over time.

Here are some unboxing images:

The box from the outside
The box from an angle
Revealing the Eee Box
The Eee Box
Keyboard
Power and mouse
Documentation
PSU
Stand and mount
Mouse
Antenna and screws
Manuals and discs
All contents
Eee Box on its stand
Size comparison with iPhone
Rear connectors
Front connectors
BIOS main screen
BIOS advanced screen
BIOS power screen
BIOS boot screen
BIOS tools screen
BIOS exit screen

Categories
Computers Linux

Proxy a web site and change the content on the fly

Apache can do just about everything with a bit of configuration. I have used HTTP proxying on a number of occasions to make content from one site appear to come from another site. This can be very handy for sites I host at home where I only have one IP address but two servers and want to host different web sites on the same public IP – and all of them on the standard HTTP port.

However, until recently I hadn’t experienced that Apache can also rewrite the content in the actual response. I was faced with the requirement to change all the URIs in the proxied web site so that they pointed to the new URL. When I first searched the net I found the module mod_proxy_html which sounded like the way forward. In the end I didn’t go that route since I found it overly complex and didn’t transform all instances of the links. Instead, the solution was simple and used another Apache module – mod_substitute.

The following virtual host configuration sets up a proxy so that the site www.one.com is proxied to www.two.com. In addition, any occurrences of www.one.com is changed into www.two.com:


<VirtualHost *>
  ServerAdmin postmaster@two.com
  ServerName www.two.com
  <Proxy *>
    Order deny,allow
  </Proxy>
  ProxyRequests on
  ProxyPass / http://www.one.com/
  ProxyPassReverse / http://www.one.com/
  AddOutputFilterByType SUBSTITUTE text/html
  Substitute "s|www.one.com|www.two.com|n"
</VirtualHost>

Categories
Computers Linux

Can’t add column in sqlite3 on Mac OS X 10.4

Mac OS X 10.4 ships with sqlite3 3.1.3 which apparently doesn’t support ALTER TABLE in order to add columns to existing tables. At least that was the explanation I found on why I couldn’t add a migration in a Rails project to add a column. Instead I got the following error when I ran “rake db:migrate”:


== 20081007233057 AddIngredientToRecipe: migrating ================================
-- add_column(:recipes, :ingredient_id, :integer)
rake aborted!
SQLite3::SQLException: near "ADD": syntax error: ALTER TABLE "recipes" ADD "ingredient_id" integer

To fix the problem I had to run “sudo gem install sqlite3-ruby”. Before I got that far, I upgraded my sqlite3 installtion to the latest version by compiling from source. I don’t know if that was actually necessary in order to solve the issue.

Categories
Computers Linux

Problem installing MySQL Ruby bindings

In a previous article I outlined the installation of a Rails environment on Ubuntu 8.04. That article fails when the target system is a clean installation of Ubuntu 8.04 since it would then be lacking the essential build environment. This is manifested when installing the native extensions for MySQL using “gem install mysql” and the error message shown is:

root@hobbit:~# gem install mysql
Building native extensions. This could take a while...
ERROR: Error installing mysql:
ERROR: Failed to build gem native extension.


/usr/bin/ruby1.8 extconf.rb install mysql
checking for mysql_query() in -lmysqlclient... no
checking for main() in -lm... no
checking for mysql_query() in -lmysqlclient... no
checking for main() in -lz... no
checking for mysql_query() in -lmysqlclient... no
checking for main() in -lsocket... no
checking for mysql_query() in -lmysqlclient... no
checking for main() in -lnsl... no
checking for mysql_query() in -lmysqlclient... no
*** extconf.rb failed ***
Could not create Makefile due to some reason, probably lack of
necessary libraries and/or headers. Check the mkmf.log file for more
details. You may need configuration options.

To fix this, just install build-essential, i.e. “apt-get install build-essential”.

Categories
Computers Linux

Make SVN trust a new CA

I routinely use Subversion to host all my software projects. For a long time I just got used to permanently accept the certificate warning when checking out a certain project – even though what I really wanted was for SVN to trust my home-made root CA certificate. Finally, I have found time to learn how to make SVN trust my CA and here is how:

  1. Download the root CA certificate
  2. Check that the certificate is in PEM form by issuing “openssl x509 -text -in certificate.crt”. If the output doesn’t make sense, then try with “openssl x509 -text in certificate.crt -inform der”
  3. To convert a DER certificate to PEM, issue “openssl x509 -in certificate-der.crt -inform der -out certificate-pem.crt -outform pem”
  4. You may want to copy the CA certificate to /etc/ssl/certs – although it is not required
  5. Edit your ./subversion/servers file. Change or add the value ssl-authority-files in the [globals] section so that it includes the CA certificate (in PEM form). The ssl-authority-files value is colon separated.
Categories
Computers Linux

Combine subversion, WebSVN and a web page in one Apache site

In my last post I wrote about how to get libapache_mod_auth_pam to play nicely with Apache2. This post is about putting it all together, complete with WebSVN and a default web page so that one can write an introductory text to the users using the site.

Getting subversion up and running on Apache was explained in the last post. The problem with that, however, is that the Location directive means that all content on the site is directed to dav_svn. Hence, it is not possible to access an index.html page in the root, nor the /websvn folder. If you try, you will just get the message “Could not open the requested SVN filesystem”.

Of course, the simple solution to this would be to put the dav_svn module one folder down in the site structure (e.g. http://svn.example.com/repositories/<repository>) by changing the Location directive to <Location /repositories/>. But that is ugly.

I assume there are many ways to solve this but here is how I did it.

  1. First, create two sites – svn.example.com and websvn.example.com (or whatever you want to call them).
  2. Configure the site svn.example.com as explained in the previous post
  3. Configure the site websvn.example.com as you would any other static site, adding a index.html file in the root with whatever content you want to have there
  4. Now, before the Location directive in the svn.example.com site definition, add the following:

  5. RewriteEngine on
    RewriteRule ^/$ index.html [R]
    ProxyPass /websvn/ http://websvn.example.com/websvn/
    ProxyPassReverse /websvn/ http://svn.example.com/websvn/
    ProxyPass /index.html http://websvn.example.com/index.html

  6. Finally, you may also want to add SSL support for the svn.example.com site but I won’t go into that here

To make this work, a couple of Apache2 modules must be enabled, namely: proxy, proxy_http and rewrite.

What the above does is that it rewrites accesses to the root URL / to /index.html. Then, all requests to either /index.html or /websvn are proxied to the other site (which does not have dav_svn enabled so they work fine there).

With everything in place, you should be able to access http://svn.example.com for the index.html page, http://svn.example.com/websvn for the WebSVN interface to the repositories – and anything else for the real repositories.

A prettier solution would be if the Location directive for Apache supported negated regular expressions but I have come to the conclusion that it doesn’t – at least not the version I am using (2.2.8).

css.php