Categories
Computers Linux

Keeping track of installed apps, part 2

In an earlier post I wrote how to output a list the currently installed applications under Debian (and distributions based upon it). This will now be extended into a script that can be run each hour to record changes to the installed applications. Now, it should be said from the beginning that this information may already be stored in the file /var/log/apt/term.log but it can be a challenge to follow what it happening.

The following script stores a snapshot of the installed applications and then makes a diff against that on a period basis (e.g. by running it as an hourly cron job). If there is a difference, the changes are saved to a time stamped file and a new snapshot is taken. All files are placed in the same log directory as apt normally uses (i.e. /var/log/apt). The downside of this method is that changes will be recorded with a granularity of an hour but usually that is not an issue as the reason for writing this was to keep an automated record of changes to the system.

#!/bin/bash
 
folder='/var/log/apt/'
installed=$folder'current'
 
if [ ! -e $installed ]; then
  echo "Creating initial file"
  dpkg-query -W -f='${Package}\n' > $installed
  cp $installed $folder'initial'
fi
 
# Compare package list against current
dpkg-query -W -f='${Package}\n' | diff $installed - \
  | grep -e '^[(<|>)]' > /dev/null
 
if [ $? -eq 0 ]; then
  # The set of installed packages has changed. Save the delta to a
  # file and save the new snapshot
 
  filename=$folder`date +%Y-%m-%d_%H-%M-%S`
  dpkg-query -W -f='${Package}\n' | diff $installed - \
    | grep -e '^[(<|>)]' > $filename
  dpkg-query -W -f='${Package}\n' > $installed
fi;
 
exit 0

Categories
Computers

Simple localisation of Rails validation messages

Rails scaffolding can be good to get up running quickly but it can also be a problem. This is for instance true when it comes to localising the error messages presented by Rails (e.g. “X errors prohibited this <object> from being saved”). The issue is caused by two things:

  1. Rails includes English default message headers for the error box without being apparent how to change them.
  2. Each individual error is prefixed by the capitalised field name. Regardless of GUI language these will probably be in English.

The first of these issues can easily be solved by replacing the default <%= f.error_messages %> with something like:

<%= error_messages_for :item,
:header_message => "Försök igen",
:message => "Några av värdena du har angivit är inte giltiga:" %>

The second is a little harder but can be solved by realising that Rails calls the method human_attribute_name on the model object, passing the column name. While it would be possible to do a switch statement or a lookup array to translate the column name, I have found it easier to just return an empty string and to provide the exact error message as part of the validation instead.

validates_presence_of :name, "Namnet måste anges"


def self.human_attribute_name(attr)
return ""
end

Categories
Computers

Boolean portability under Rails

Booleans should be so simple. They can only have two values. As a former colleague used to say – How hard can it be? With all the variants of “0/1”, “Y/N”, “t/f” the answer seems to be – Apparently quite so.

Rails 2.0 switched the default database engine to sqlite3 and this has now caused me two issues. The first I wrote about some time back. The last one I just stumbled upon was related to booleans.

This works in MySQL:

@guests = Guest.find(:all, :conditions => 'accept = 1')

But it fails in sqlite3 since Rails stores booleans as ‘t’ or ‘f’ on that database engine. The portable way to write the condition in Rails is to make Rails itself select the proper value depending on the underlying database by writing it like this:

@guests = Guest.find(:all, :conditions => ['accept = ?', true])

Categories
Computers Linux

Keeping track of installed apps under Debian

I am setting up my new server with Ubuntu 8.10. This time, I am planning to keep track on all the software I install on it so that I might restore it in the future. Thankfully, with the Debian package manager this is a simple task.

The following command creates a text file with all the installed applications on the system:

dpkg-query -W -f='${Package\n}' > installed-apps

The file will put one one package name on a line and end it with a line break, saving the output to the file installed-apps. By changing the \n at the end into a space it is possible to get a single long string with all the package names.

After a while you may want to know which packages have been installed since the initial operating system installation. There are no doubt many ways of doing this but the easiest I have come up with is to run the same command as above, but save the output to another file, and then to run ‘diff’ on those two files. Note that this requires that the output from the dpkg-query command above was using line breaks to separate packages.

Categories
Computers Mac

Create ISO on Mac OS X 10.4

On Mac OS X 10.5 it is possible to create ISO files directly from the Disk Utility application but on Tiger, this is not supported. A quick solution is to use the terminal and realising that an ISO file is nothing more than a binary dump of the contents of the disk:

Start by opening a terminal window and insert the CD or DVD you wish to make an image out of. Then type “drutil status” to get information on the CD/DVD reader.

Unmount the disk by typing

$ diskutil unmountDisk /dev/disk1
Disk /dev/disk1 unmounted

Create the ISO file by using the dd command:

$ dd if=/dev/disk1s0 of=image.iso bs=2048

Note: It appears that the device should be stated as above for CDs but similar to /dev/disk1 for DVDs. YMMV

Categories
Computers Mac

Partition USB disk with FAT16 on Mac OS X

A previous article explained how to upgrade the BIOS on an Eee Box by using a USB memory formatted with FAT16.

As far as I have found, formatting with FAT16 can not be done through the GUI on Mac OS X. Instead one has to use the terminal.

First type “diskutil list” to see the devices on your system, making very sure that the following command is applied to the USB flash drive and not to a drive with important data. You have been warned!


diskutil partitiondisk /dev/disk1 1 MBRFormat "MS-DOS FAT16" "Data" 512M

The arguments have the following meanings:

  • /dev/disk1: The disk device to be partitioned and formatted
  • 1: The number of partitions
  • MBRFormat: The partition format
  • MS-DOS FAT16: The partition type
  • Data: The partition name
  • 512M: The size of the partition
Categories
Computers Gadgets Linux

Automatic boot after power loss on Asus Eee Box

I have been planning to upgrade my old Mini-ITX based Linux server with an Asus Eee Box. I have purchased the Eee Box and was just waiting for the upcoming release of Ubuntu 8.10 to run on it. But then I noticed that the computer didn’t start automatically after a power outage. There is usually a setting in the BIOS for this but I just couldn’t find it on the Eee Box. Not being able to boot automatically after a power loss posed a major setback for my plan of migrating my server.

It turns out that the Eee Box BIOS prior to version 0902 didn’t have support for restore after power-loss so to solve the issue I had to upgrade the BIOS.

Normally, BIOS upgrades can be a source for some concern as there is always a risk that the computer is left completely bricked. Also, it can be difficult to get a bootable USB device with the correct BIOS flashing utility and with the new BIOS firmware.

The BIOS firmware can be downloaded from Asus support pages by searching for the Eee Box model name (B202).

The documentation for the Eee Box was not very helpful. It said that there is a upgrade utility in the OEM version of Windows that the computer came with. However, the first thing I had done with the computer was to wipe the hard drive and to install Ubuntu.

The solution to the problem is to insert a FAT-16 formatted USB device with the desired BIOS firmware, then boot while pressing Alt+F2 to get into a special boot menu. There, one can choose the firmware file.

This was definitely the simplest BIOS upgrade processes I have come across – once I found the information on how to do it.

Categories
Computers Gadgets Linux

Upgrading the RAM on Eee Box

As I wrote in a previous post, I recently purchased an Eee Box. As I targeted it as a replacement mail and web server I thought that the included 1GB RAM was a tad low. I bought the replacement memory together with the Eee Box itself and here are some images and comments outlining the process of upgrading the memory.

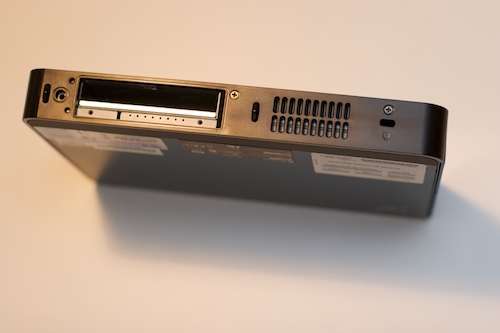
Both the hard drive and the memory are accessible from the bottom of the device. Removing the table stand (notice the screw mount on the left in the image) reveals the following:

Before RAM upgrade

The left one of the two Eee Box stickers needs to be removed in order to access the hard drive. The sticker on the right needs to be removed for the RAM upgrade. Although I was only planning on upgrading the RAM, I peeled off both stickers.

Without stickers and with the hard drive removed

The hard drive is a Seagate Momentus 5400.5 160GB. It looks simple enough to switch out for a larger one if that is required. 160GB is plenty for the tasks that I will use it for so I didn’t change it.

Original Eee Box hard drive

With the two screws on the right (see image above) removed the side cover can be removed. This led to some confusion as the few other guides on the Internet didn’t mention exactly how to pry off the cover. To help you out, have a look on the following image. The side where the screws were (shown with red) is already loose and there is no need to try to start from there. Instead take a table knife and work on the spots shown with the green crosses where the cover is kept in place.

How to open the Eee Box

With the side cover off we now need to unscrew just one screw in order to access the memory compartment in the lower right:

Eee Box with the side cover off

The unit was originally equipped with two DDR2 667 MHz SO-DIMM cards of 512MB each.

The original RAM memory is exposed

I took out the original memory and instead inserted two 1GB DDR2 667 MHz SO-DIMM cards made by Crucial.

New RAM memory

Finally, I booted the computer and checked the memory.

Task manager showing 2GB of RAM

Five minutes after this I had started installing Ubuntu 🙂

While this process was slightly more complex than changing memory on just about any other computer (laptop or stationary) some kudos goes to Asus for making it much easier to change the RAM than what was the case on my Acer Aspire One. The only really non-trivial part was getting the side cover off without breaking it. However, once I knew how to open it, it was actually trivial as well.

Categories
Computers Gadgets Linux

Uuunboxing the Eee Box

The Eee Box has finally been launched here in Sweden. I have had my eyes on it for some time as I am in dire need of upgrading my old server (mail, web etc) and this looks ideal from a performance/electricity point of view. It also comes at a very good point with the rather recent LTS release of Ubuntu 8.04 – although I will probably go for the bleading edge and run Intrepid Ibex when it is released on October 30th. The Eee Box is only available with Windows here in Sweden but hopefully that will change over time.

Here are some unboxing images:

The box from the outside
The box from an angle
Revealing the Eee Box
The Eee Box
Keyboard
Power and mouse
Documentation
PSU
Stand and mount
Mouse
Antenna and screws
Manuals and discs
All contents
Eee Box on its stand
Size comparison with iPhone
Rear connectors
Front connectors
BIOS main screen
BIOS advanced screen
BIOS power screen
BIOS boot screen
BIOS tools screen
BIOS exit screen

Categories
Computers Linux

Proxy a web site and change the content on the fly

Apache can do just about everything with a bit of configuration. I have used HTTP proxying on a number of occasions to make content from one site appear to come from another site. This can be very handy for sites I host at home where I only have one IP address but two servers and want to host different web sites on the same public IP – and all of them on the standard HTTP port.

However, until recently I hadn’t experienced that Apache can also rewrite the content in the actual response. I was faced with the requirement to change all the URIs in the proxied web site so that they pointed to the new URL. When I first searched the net I found the module mod_proxy_html which sounded like the way forward. In the end I didn’t go that route since I found it overly complex and didn’t transform all instances of the links. Instead, the solution was simple and used another Apache module – mod_substitute.

The following virtual host configuration sets up a proxy so that the site www.one.com is proxied to www.two.com. In addition, any occurrences of www.one.com is changed into www.two.com:


<VirtualHost *>
  ServerAdmin postmaster@two.com
  ServerName www.two.com
  <Proxy *>
    Order deny,allow
  </Proxy>
  ProxyRequests on
  ProxyPass / http://www.one.com/
  ProxyPassReverse / http://www.one.com/
  AddOutputFilterByType SUBSTITUTE text/html
  Substitute "s|www.one.com|www.two.com|n"
</VirtualHost>

css.php